
This is another perfect example of not wasting food.
I'm not a cheapskate. I buy things I want and need if I have the money, but I truly hate to waste my money. And that includes spending good money on food and then having it end up in the trash. I always clean out the refrigerator every time I come home from grocery shopping and always try to make something out whatever is still in good shape. Unfortunately, sometimes something ends up in the trash. Food poisoning is not on the menu at our house.
Fortunately, my husband and I are both good about eating leftovers. I take them for lunch most of the time, and he will eat whatever is in the fridge during the day. (He works at home.) I wanted to make salad for dinner so I started to gather what I need from the refrigerator, only to find that the lettuce had frozen! Arggh! I had turned down the temp in the fridge for some crazy reason, only to find that a lot of what was in there froze or formed ice crystals. The baby carrots froze in the veggie crisper, as did the baby zucchini. Usually carrots don't thaw well to eat raw, they get kind of mushy, but they were ok. Maybe they weren't frozen solid. And the zucchinis are never the same again unless you have blanched them before freezing. But, I WAS NOT going to let them go to waste. I made what I like to call Spaghetti Vegetables. But more on that later. Let's get back to that frozen romaine.
Lettuce absolutely does not come back to its original form once frozen. But I WAS NOT going to throw that away either. I put it back in the fridge grumbling under my breath about the $2.89 I was going to have to throw away. Since the lettuce froze and I couldn't make salads, I had to figure out something else to make for dinner. I checked everything else in fridge and found that I had some carrots left from last shopping day, three parsnips and some celery. Hmmm. Vegetable Soup was in the making and I knew exactly what I would do with the now frozen lettuce. I started slicing and dicing and sauteing, and before I knew it I had a really yummy pot of Vegetable Soup. Yes that's right, I used the lettuce in the soup. Just like you would have put spinach or kale into a soup. I c
 ut up the lettuce and dropped it in the pot to let it simmer with everything else. Once everything was soft, I tasted it. It was delicious! Other than the lettuce, I used only root vegetables in the soup so it had that sweetness that only root vegetables can lend. It was so satisfying and aromatic. The lettuce was softened nicely, and tasted .... well.... green. It only had a very slight taste of lettuce and it was wonderful in the soup. I really don't think that anyone would have know it was lettuce unless I had told them.
Here's how I made my Root Vegetable Soup with Romaine Greens
2T canola or corn oil
1 medium yellow or white onion, diced
2-3 large cloves of garlic, peeled
4 large carrots, peeled and sliced
4 parsnips, peeled and sliced
4-5 stalk of celery, washed and sliced
3 cans of chicken or vegetable stock (about 6 cups or enough to cover veggies by an inch)
salt/pepper to taste
1 head of romaine lettuce, sliced
1/4 lb. Orzo pasta (optional, or use any other small pasta or cooked rice)
Dice the onion and saute on low/medium heat while you do the rest of the slicing/dicing.
Mince the garlic very small, add to the onions and give it a stir
Peel and slice the carrots and parsnips, add to the saute pan and stir.
Clean and slice up the celery and add to the other sauteing vegetables.
Let the veggies saute until they are about half way done.
Add the stock. If its not enough liquid to cover the veggies by an inch, add some water and some chicken flavoring, or another can of stock.
Add the sliced romaine, salt and pepper
Let everything simmer on low until the lettuce and veggies are just done. Re-season as necessary with salt and pepper when done.
I loved this soup and will make it again for one of my soup nights!
Spaghetti Vegetables
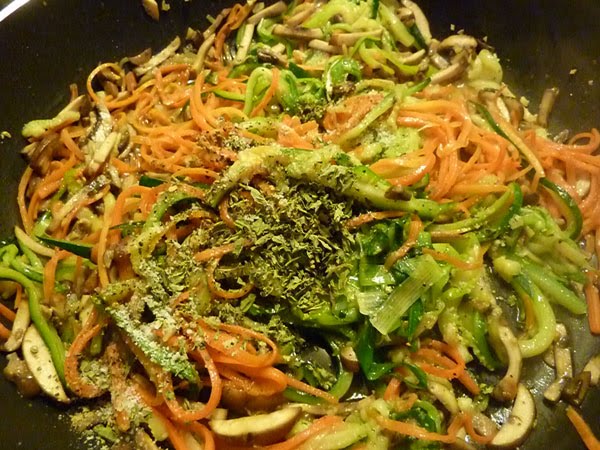
Here's how I de alt with those frozen baby zucchini. Ughhh! I was thinking I'd have to puree them to be able to use them. After all, they weren't spoiled! The skin on a zucchini gets kind of mushy if you freeze it fresh and then thaw. Well as it happens, I fell for that ad on TV for the Titan Peeler. It came with another tool that juliennes vegetables really well. Almost as well as an expensive mandolin! Not as fast, but it works really well. All you have to do is run the tool over the veggies with a little pressure, and voila! Lovely thin strings of veggies! (I recommend the Titan Peeler and the other gadgets it comes with, I love it!) So, I started thinking and thinking. I julienned the two frozen baby zucchinis into strips the whole length of the zucchini. Then I julienned two large carrots, the whole length of the carrot. I sliced three scallions long ways so they looked like the zucchini and carrots. I wanted everything to be long like spaghetti noodles. Then I took some of the biggest mushrooms I could find, and although I could not use my tool on them I sliced them into very thin slices. So now I had a whole table full of these "strings". I sauteed everything with garlic, and when the veggies were soft, about 5 minutes, I added all the seasonings at once, some ricotta cheese, Parmesan cheese and some cooked and drained whole wheat
 pasta. This is one of those dishes where the whole wheat pasta works well with the other flavors.
Here are the quantities:
3/4 lb. of whole wheat spaghetti or angel hair pasta
2 small zucchini - julienned
1 - 2 long carrots, julienned
3 - 4 scallions, sliced longways into thin strips
2 t salt
1 t cracked pepper
1/2 t red pepper flakes (or more if you like it spicy)
2 large cloves of garlic finely minced
1- 1/2 c c ricotta cheese
1/2 c Parmesan cheese
1/2 c chicken stock (or enough to create a nice sauce with the cheeses you added) This made enough for our dinner and two leftover lunches for me.
 alt with those frozen baby zucchini. Ughhh! I was thinking I'd have to puree them to be able to use them. After all, they weren't spoiled! The skin on a zucchini gets kind of mushy if you freeze it fresh and then thaw. Well as it happens, I fell for that ad on TV for the Titan Peeler. It came with another tool that juliennes vegetables really well. Almost as well as an expensive mandolin! Not as fast, but it works really well. All you have to do is run the tool over the veggies with a little pressure, and voila! Lovely thin strings of veggies! (I recommend the Titan Peeler and the other gadgets it comes with, I love it!) So, I started thinking and thinking. I julienned the two frozen baby zucchinis into strips the whole length of the zucchini. Then I julienned two large carrots, the whole length of the carrot. I sliced three scallions long ways so they looked like the zucchini and carrots. I wanted everything to be long like spaghetti noodles. Then I took some of the biggest mushrooms I could find, and although I could not use my tool on them I sliced them into very thin slices. So now I had a whole table full of these "strings". I sauteed everything with garlic, and when the veggies were soft, about 5 minutes, I added all the seasonings at once, some ricotta cheese, Parmesan cheese and some cooked and drained whole wheat
 pasta. This is one of those dishes where the whole wheat pasta works well with the other flavors.
Here are the quantities:
3/4 lb. of whole wheat spaghetti or angel hair pasta
2 small zucchini - julienned
1 - 2 long carrots, julienned
3 - 4 scallions, sliced longways into thin strips
2 t salt
1 t cracked pepper
1/2 t red pepper flakes (or more if you like it spicy)
2 large cloves of garlic finely minced
1- 1/2 c c ricotta cheese
1/2 c
 Parmesan cheese
1/2 c chicken
 stock (or enough to create a nice sauce with the cheeses you added) This made enough for our dinner and two leftover lunches for me.
The Spaghetti Vegetables has become a favorite and I make once in a while now. It's low cal, loaded with nutritious veggies, and since I used whole wheat pasta, it also has lots of vitamins and fiber.
We ate this as "vegetarian" meal (it had chicken stock in it), but it would make a wonderful side dish for almost anything, garlic shrimp, grilled steak, grilled chicken, even a nice piece of steamed fish with butter and lemon.


